

How to put down your bullet points and pick up a pencil…
I’ve almost given up on delivering written reports as a UX research output, favouring video and large scale visuals instead. (I explain why here)
How to:
In this article I’ll walk through my process and the tools I use, in the hope you can do something similar for your clients.
This is also a way to share some of the content of a few talks I gave in NY and SF in 2015, about visualising design research.
My talk ran through how I’ve blended communication styles from former careers in art and architecture to communicate the types of insights we find in UX research projects, where I’ve found traditional reports just don’t cut it.
One thing I wanted to be sure my audiences took away was a feeling of “I could totally give that a go on my next project”.
So if after reading this article you’re not thinking like that, I’ve missed the mark. Doh.
Here’s one I prepared earlier:

For ‘Ward life’, a project for a healthcare client – I was asked for only visual deliverables, as the team found the video/poster combo so compelling on our previous project it left the report in the dust.
Knowing there would be a visual at the end, I photographed the process so I could share it.
The goal was to understand the social and emotional experience of patients in a shared hospital ward situation. I partnered with a chaperone (who’s also a natural interviewer) and we hit the wards – spoke to nurses, patients, their families etc., emerging later with insights – as you do.
This part of a research project is where you need to start considering how best to communicate what you’ve found…
Here are the steps I took to convert a set of findings into this visual:
FIRST: Lay out your key insights.
These can be single words, or statements.
Arrange these in a way which best frames the messages you want to communicate.
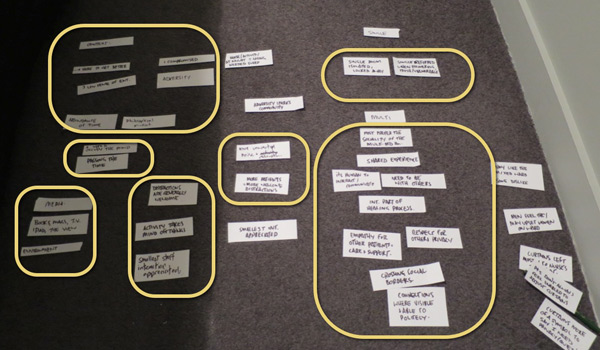
Group around themes and sub-themes, relationships, this one feeds into that one etc.
While doing this I’m thinking of a narrative. A starting point and the flow, or the way I want the viewer to take in the content.
In this case I’ve grouped the insights around:
- The patient’s context
- Their mindset and moods
- Environmental factors which contribute to their experience
- The importance of distraction
- The psycho-social aspects of being in the shared ward, and in a single room.
… and as I’m doing it I’m realising, how these relate to each other.
Thinking in two dimensions.
This is a bit like ‘storyboarding’ – you’re essentially weaving a story, frame by frame.
I’ve found moving the parts around directly on paper is a great way to build a story, and helps me join the dots between the things I’ve found and what they mean.

You’ll need to be acting out a dialogue in your mind, between the content and the audience… converting this dialogue into a visual format. Think about the story you want to tell, where you want to place the accent and importance, and the quotes you want to use (speech or thought bubbles).
Rather than drawing all the ‘things’ I’ve just drawn text boxes or a description of what it should convey, like here it might be ’Patient in bed with ipad’ so my collaborators have an idea what I’m thinking.
Working at this basic level means it’s easy for people to contribute, add texture or meaning where it’s needed. (Like suggesting ‘patient wearing headphones’ etc.)
Add people and props.
This is the part where you literally put the people in the picture and think about the words and phrases you want to use.

Your audience will be drawn to illustrations of people and the text immediately connected to these, so give thought to where you want this attention. At this stage I use a few stick or bubble figures with speech bubbles as placeholders to give myself, (and sometimes a client) a sense of how we could portray what’s going on in the moments / interactions in the patients’ world.
Make a list, and go shopping.
When I’m feeling happy with the arrangement and have an idea of which parts of the story should be supported by illustrations , it’s time to give the stick figures an upgrade.
I literally list out all the drawings I need and think about which ones I can draw, and which ones I’ll need help for.

And when I say help, I mean Google Image Search. Here I typed in ‘Hospital bed’ to get an idea how these looked from a couple of angles. If you’re not so confident at drawing these things from screen, try printing them out and tracing them. Just hold them up to a window if it’s from a photo.
Keep it simple.
I try to avoid drawing busy scenes, so reduce illustrated elements to only where they will add value and support the narrative.
This means blob-headed androgynous people, sometimes without arms and other details. My experience is that it’s about what’s written in the speech bubble rather than whether your sketch of a person is wearing trainers or brogues. That’s why you didn’t realise the person pushing the tea trolley was male or female, let alone naked (!)

As you can imagine a finer level of detail can be handy at times, for example I could have had a stethoscope round the neck to identify a doctor in this image, but it wasn’t important enough to add it.
By the end of this you should have line drawings on paper ready to be scanned so you can put them into a digital document.

Get digital.
Open up a layout program that handles images and text. (I use Adobe Indesign) and set a massive document size. This one was about 1400mm wide x 900mm high. (You’re going to print this out BIG).
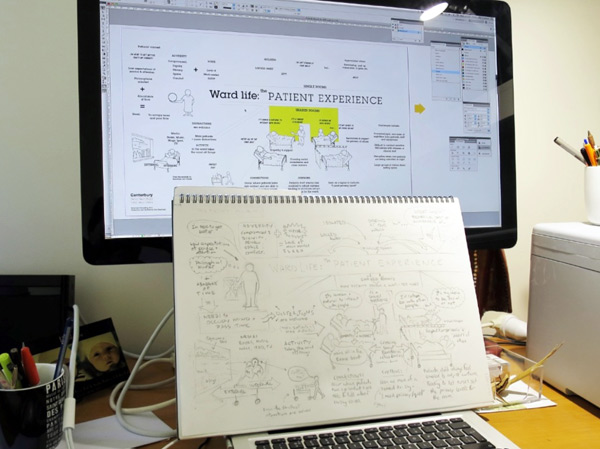
From here, use the ‘Text box’ tool to add in all your text as individual elements, then import your scanned drawings and go to work arranging these, being faithful to your paper mock-up.
Establish hierarchy.
Ok, it’s bit of a high-falooting word, but once I’ve got all the content loosely arranged I usually go about assigning a few type ‘styles’ so I can use sizing and bold etc. Creating this visual hierachy adds prominence and weight where it’s needed.

I’m usually thinking – “If someone’s only going to spend one minute looking at this, what do I want to be sure they’ll take in?”
… then assign extra weight to those elements. It’s not just a matter of making things bigger, sometimes giving more space around them can help with this.
Boxes and arrows.
It’s no coincidence that software toolkits have boxes, arrows, shapes and lines. This combo (and text of course) is all you really need, and doesn’t take long to get the hang of.
In this visual I’ve used boxes to say ‘these belong together’ some triangles for big arrow heads, and for the floor and walls I used the line tool where you just keep clicking corner points, then choose a colour for the ‘fill’.

After text and speech bubbles, (an oval and a triangle joined together) arrows are one of the hardest working tools in the box – particularly for non-linear artefacts like this one. They help guide the viewer around, and show the links and sequence of things.
Indesign or even much less sophisticated programmes will have an easy toolbox and menu of line and arrow types, thin ones, fat ones… Mix it up!
Colouring in.
I keep things in black-white and greys as long as possible to make sure the message is getting across without colour, then go to Adobe Kuler to pick a palette of 3-5 colours, using some to add depth, and one or two for accents.
Printing.
Go BIG.
I recommend you call your local print shop, ask them how wide their roll is, and make this the shortest dimension of the printout.

A ‘wall sized’ visual (as opposed to individual A3 printouts) gets more eyeballs.
A poster provides a shared experience, get’s people out of their seat and generates the sort of response and conversation that matters to your project.
If you’ve read this far, you probably agree that ‘generating conversations that matter’ is a job text based reports all-too-often fail at.
So …pick up your pencil and start a conversation.
Can’t wait to give it a try! Thank you.
Another brilliant article Nick. Thanks for sharing. It seems like an achievable goal when it’s broken down like this.
Using an iPad pro and pencil might reduce some of the steps?
Agree with Simon, brilliant article once again Nick. Does make it seem less daunting, particularly for those of us who might a bit more ‘creatively challenged’ 😉
Think this is a much more interesting way of presenting those ‘one-pagers’ that are so popular in government. And also helps with that question “If someone’s only going to spend one minute looking at this, what do I want to be sure they’ll take in?”
Wishing you a most excellent festive season!
This is simply brilliant. Just yesterday I was in a deep conversation about sketching out your process, and ideation thoughts before moving into the design phase of a project. Excellent read. M
This is great. I’ve been following and researching this area for the past six months and trying to understand what this is all about and how I can apply it within my work. This is a great step by step process you have provided – thank you. Am very interested in getting into this type of work – I’m a qualitative researcher but don’t have any design background etc.
Pingback: 【硅谷设计师周报】如何做好设计团队的带头喵;从Dribbble的55000多个UI动画里,我学到了什么… - UXRen
Thank you so much for sharing, Nick. Very generous of you.
Another great article. Thanks for sharing. A picture is worth thousand words and tend to stick with you longer 🙂
Pingback: 10 questions to ask before any user research - UX for the masses